2022年4月20日 星期三

使用Edge Impluse build一隻動作分類c/c++ sample

利用Edge Impluse 已有的data set跟training好的model, 產生出c/c++ library, 接著將model include進c/c++ main code, 並帶入一串sensor xyz data來判斷這個動作是左右或上下移動.


0. Windows OS先安裝MinGW

Sourceforge下載來的exe檔常常遇到一個error.


可以直接到這邊抓免安裝包

https://sourceforge.net/projects/mingw-w64/files/mingw-w64/


兩個都可, 下載後unzip到C:\mingw64 , 將C:\mingw64\bin 加到環境變數中.

開cmd測試gcc -v可以正常執行環境就ok.


1. Edge Impluse 專案設定.

使用官方training好的data做範例

https://studio.edgeimpulse.com/public/76063/latest

右上的clone this project, clone到自己的workspace. clone完之後, 選Deployment --> C++ library --> Build

完成之後會自動下載一包my-motion-project-v3.zip


2.  Sample code download

官方sample code
C:

C++:

3. Merge library to sample code

my-motion-project-v3.zip解壓縮後的檔案放到sample code folder中


C++的sample直接build.bat就可以, C的sample要加以下這行在Makefile中

CFLAGS += -DEI_PORTING_MINGW32=1

確認可以正常build完後, 接著帶入要辨識的xyz data. 回到Edge Impluse clone出來的project. Model testing隨意選一筆data show classifiction.
 
進去後會看到連續的raw data, 可以隨意移動框框, 下面的raw features會跟著變化, 都是三個資料為一小組, 直接複製raw features出來.


C++ sample中, 將資料貼到main.cpp的features array


compile之後run就會看到結果


C sample使用帶入檔案的方式, 將剛剛copy的raw features另存成一個檔案, 帶入即可


Reference:

2018年4月12日 星期四

Press a key to control a led device on i.mx6

根據前一篇Linux input system and keypad driver on i.mx6

經過上面步驟已經可以正確傳遞keypad event並且透過evdev read function讀到key code. 透過key code可以再control led or pwm device.
透過led.h 中的led_trigger_register_simple以及led_trigger_event便可以trigger event set led brightness.
 
Sample:
evdev.c

#include 
struct led_trigger *test_led_trigger = 0;

static int __init evdev_init(void)
{
    led_trigger_register_simple("debug-leds", &test_led_trigger); //註冊test_led_trigger的trigger led label是debug-leds

    return input_register_handler(&evdev_handler);
}

static void __exit evdev_exit(void)
{
    led_trigger_unregister_simple(test_led_trigger);
    test_led_trigger = 0;
 
    input_unregister_handler(&evdev_handler);
}

在device tree中宣告
    leds {
        debug-leds {
            gpios = <&gpio1 2 0>;
            linux,default-trigger = "debug-leds";
            default-state = "off";
        };
};

接著回到evdev.c
static ssize_t evdev_read(struct file *file, char __user *buffer,
     size_t count, loff_t *ppos)
{
…
//此處會讀input event的data
while (read + input_event_size() <= count &&
       evdev_fetch_next_event(client, &event)) {
 printk("event type = %x, code = %x, value = %x\n",event.type, event.code, event.value);
            if(event.code == 0x1c){ //key code is "enter"
                printk("key code is 0x1c\n");
                led_trigger_event(test_led_trigger, LED_FULL); //設定test_led_trigger control 的led 亮度為FULL(255)
            }
 read += input_event_size();
}
…
}

如此在收到特定key code時, "gpio1 2"這顆led便會被開到全亮.
這邊要注意的是若要控制的是pwm device, 那需要先將device宣告為pwm-leds就一樣可以使用led trigger來控制. 只需在led_trigger_event第二個arguments填入0-255的數字就可以設定pwm cycle.
 
device tree example:
pwmleds {
    compatible = "pwm-leds";
    backlightk {
        label = "backlight-leds";
        pwms = <&pwm1 0 8333333>;
        linux,default-trigger = "debug-leds";
        max-brightness = <255>;
    };
};

詳細code流程如下
 
led_triggers.c
void led_trigger_register_simple(const char *name, struct led_trigger **tp)
{
 struct led_trigger *trig;
 int err;

 trig = kzalloc(sizeof(struct led_trigger), GFP_KERNEL);

 if (trig) {
  trig->name = name;
  err = led_trigger_register(trig); //將led_trigger建立到list中
  if (err < 0) {
   kfree(trig);
…
}

Trigger event時
void led_trigger_event(struct led_trigger *trig,
   enum led_brightness brightness)
{
 struct list_head *entry;

 if (!trig)
  return;

 read_lock(&trig->leddev_list_lock);
 list_for_each(entry, &trig->led_cdevs) { //search list to find the trigger
  struct led_classdev *led_cdev;

  led_cdev = list_entry(entry, struct led_classdev, trig_list);
  led_set_brightness(led_cdev, brightness); //找到device之後最終調用device driver的brightness_set做亮度設定
 }
 read_unlock(&trig->leddev_list_lock);
}

Linux input system and keypad driver on i.mx6

Refer to below, register gpio keypad to a  gpio-keys
https://community.nxp.com/thread/343346

Declare keys in device tree
 
keys{
        compatible = "gpio-keys";
        #address-cells = <1>;
        #size-cells = <0>;
        autorepeat;
        keypad-01{
            label = "keypad-01";
            gpios = <&gpio4 30 1>;
            linux,code = <2>; /* KEY_RESERVED  */
        };
        keypad-02{
            label = "keypad-02";
            gpios = <&gpio4 31 1>;
            linux,code = <3>; /* KEY_RESERVED  */
        };
};   
Note: 若設置autorepeat那按下key不放時, input event會一直發. 若沒設定時就只會發一次, 但是Yocto OS在沒收到release event之前會自動做autorepeat的動作.

宣告為"gpio-keys" 或是 "gpio-keys-polled" keypad都可以正常動作. 差異在"gpio-keys-polled"需多定義"poll-interval". 還有在register input device的時候一個是register成input device, 另一個是register成input polled device. 資料結構不同. 以及一個是使用interupt方式, 另一個則是polling mode.


根據以下兩張圖, linux input system 主要分為三個部分, input core, input device driver, input event driver. Input device driver負責control各interface的hardware device. Input event driver負責處理傳入的事件以及向上傳到application. Input core負責串起device driver以及event driver.


Event driver (Ex: evdev.c) init時, 會註冊一個input handler到input system list.

 
static int __init evdev_init(void)
{
	return input_register_handler(&evdev_handler);
}

Device probe時, 會註冊一個device到input system list.

 
error = input_register_polled_device(poll_dev);
if (error) {
	dev_err(dev, "unable to register polled device, err=%d\n",
		error);
	goto err_free_gpio;
}
當device以及handler做register時, input core都會使用input_attach_handler 來搜尋相對應的device以及handler. 若是有找到相對應的device以及handler, 則建出一個input handle供以後使用.
當有找到相對應的device以及handler時, 會調用handler的connect function, 以evdev來說, 就會在connect function當中建出/dev/input/eventX
便可以將event與device driver串在一起.

 
input.c
int input_register_handler(struct input_handler *handler)
{
	struct input_dev *dev;
	int error;

	error = mutex_lock_interruptible(&input_mutex);
	if (error)
		return error;

	INIT_LIST_HEAD(&handler->h_list);

	list_add_tail(&handler->node, &input_handler_list);

	list_for_each_entry(dev, &input_dev_list, node)
		input_attach_handler(dev, handler);

	input_wakeup_procfs_readers();

	mutex_unlock(&input_mutex);
	return 0;
}

int input_register_device(struct input_dev *dev)
{
…
	list_add_tail(&dev->node, &input_dev_list);

	list_for_each_entry(handler, &input_handler_list, node)
		input_attach_handler(dev, handler);

	input_wakeup_procfs_readers();

	mutex_unlock(&input_mutex);
…
}

static int input_attach_handler(struct input_dev *dev, struct input_handler *handler)
{
	const struct input_device_id *id;
	int error;

	id = input_match_device(handler, dev);
	if (!id)
		return -ENODEV;

	error = handler->connect(handler, dev, id); //匹配成功就调用handler的connect函数 
	if (error && error != -ENODEV)
		pr_err("failed to attach handler %s to device %s, error: %d\n",
		       handler->name, kobject_name(&dev->dev.kobj), error);

	return error;
}

evdev.c
static int evdev_connect(struct input_handler *handler, struct input_dev *dev,
			 const struct input_device_id *id)
{
…
	dev_set_name(&evdev->dev, "event%d", dev_no);

	evdev->handle.dev = input_get_device(dev);
	evdev->handle.name = dev_name(&evdev->dev);
	evdev->handle.handler = handler;
	evdev->handle.private = evdev;
	
	evdev->dev.devt = MKDEV(INPUT_MAJOR, minor);
	evdev->dev.class = &input_class;
	evdev->dev.parent = &dev->dev;
	evdev->dev.release = evdev_free;
	device_initialize(&evdev->dev);

	error = input_register_handle(&evdev->handle);
	if (error)
		goto err_free_evdev;

	cdev_init(&evdev->cdev, &evdev_fops);
…
}
到這邊串起之後, 便可以將input device產生的訊息(touch screen座標, key-code…etc)傳給input handler. 或是將input handler的訊息交給input device(如鼠标的闪灯命令).

實際在使用時, 如果按下一個key, 不管是interupt或是polling mode, 都是在收到動作之後, 透過input_event來向input handler傳遞type, code, value這三項內容. 然後便可以從cat /dev/input/eventX 或是調用evdev的read function來得到輸入的資料.

open /dev/input/eventX 之後便可使用evdev_fops的read/write/ioctl function, Yocto在進入os時有open device, 並且read device. 但是還沒找到Yocto在哪邊做open及read.

到這邊就可以完成按下gpio keypad發出一個linux standard keycode.


Reference:
https://blog.csdn.net/yueqian_scut/article/details/47903853
https://blog.csdn.net/yueqian_scut/article/details/48026955
https://blog.csdn.net/qq_695538007/article/details/9153099
https://blog.csdn.net/qq_695538007/article/details/9153135
http://www.jollen.org/blog/2009/04/linux_input_device_apis.html
https://patchwork.kernel.org/patch/2848259/
https://community.nxp.com/thread/343346

2017年12月11日 星期一

i.mx6 LVDS clock structure

Dump all clock source data command
#cat /sys/kernel/debug/clk/clk_summary


LDB clock use path LDB_DI1_IPU -->ldb_di1_ipu_div -->ldb_di1_clk_sel
從ldb_di1_clk_sel過來的clock固定只能 /3.5(lvds split mode) or /7(lvds non-split mode)


在ldb_di1_clk_sel則可以選擇5個不同clock source
其中PLL2 PFD0/PLL2 PFD2/pll3_sw_clk往前都沒有其他的clock select或是divider.
mmdc_ch1 clock如下圖則還有clock select以及divider
黃色標出的部分都可以再尋找register做clock source以及divider的設定


pll5 clock set
pll5 clock可分為兩個部分.
1. 從24MHz OSC出來計算PLL5的clock, 參考公式如下圖

Fref = 24Mhz
DIV_SELECT = CCM_ANALOG_PLL_VIDEOn offset 0-6, range 27-54
NUM = CCM_ANALOG_PLL_AUDIO_NUM offset 0-29
DENOM = CCM_ANALOG_PLL_AUDIO_DENOM offset 0-29
NUM must less than DENOM.
Example
24MHz * (29 + 8666666 /10000000 ) = 716.79984MHz
716MHz = pll5 = pll5_bypass = pll5_video

2. 由第一步計算出的PLL5 clock, 再經由2個2bit divider, 可以 /1 /2 /4 /8 /16來產生出最終的pll5_main_clk


總結:
由ldb_di1_clk_sel當中選擇出的clock, 再根據split mode來決定/3.5 or /7就可算出最終ldb輸出的clock frequency.

2017年9月20日 星期三

mtd device for spi nor flash

spi flash不是直接access到spi flash, 而是透過mtd再往下

                   MTD
         ------------------------
              SPI NOR framework
         ------------------------
                  m25p80
         ------------------------
      SPI bus driver
         ------------------------
      SPI NOR chip

在i.mx cpu下的架構會略有不同

                   MTD
         ------------------------
              SPI NOR framework
         ------------------------
                fsl-quadSPI
         ------------------------
      SPI NOR chip

但是從log來看fsl-quadSPI還是有用到m25p80這隻driver

m25p80目前看來可以通用在所有的spi nor flash, 要新增只要把id相關瑱入table中就好

目前spi nor flash不透過spidev這個device來access, 所以不需要掛spidev在spi device下.

spidev目前看來是直接access spi device的, 如果有需要透過spidev直接control device才需加入device tree

http://blog.5ibc.net/p/14266.html

2017年9月8日 星期五

git branch have diverged

============ 當 Conflict when git pull =====================

如果 git pull 時發現有 Conflict, 但你又明明沒有加入任何 commit,
有可能是因為原來的 branch 已經走到分支出去了,
你可以打入 git status

# On branch master
# Your branch and 'origin/master' have diverged,
# and have 32 and 83 different commit(s) each, respectively.
#

第一個數字 32 代表著你比 origin/master 多了 32 個 patch, 第二個數字 83 代表著你比 origin/master 少了 83 個 patch 如果你很有興趣知道是那一些可以利用 git cherry origin/master 來看

1. 執行 git reset --hard HEAD^ 一直到你可以做 fast-forwarded

2. 直接執行 git pull --rebase origin/master

http://pjack1981.blogspot.tw/2012/03/git.html
https://github.com/zlargon/git-tutorial/blob/master/remote/sync.md

2017年7月24日 星期一

Android propery

Android property 與BIOS的variable感覺相當類似, 都是可以作為一些變數往後傳遞.
但是property更簡單的是因為他是用檔案形式, 所以要驗證的時候開檔案來看就好.

property service是在init.c當中啟動.
1)间接调用__system_property_area_init():打开属性共享内存,并记入__system_property_area变量;
2)间接调用init_workspace():只读打开属性共享内存,并记入环境变量;
3)根据init.rc,异步激发property_service_init_action(),该函数中会:
    l  加载若干属性文本文件,将具体属性、属性值记入属性共享内存;
    l  创建并监听socket;
4)根据init.rc,异步激发queue_property_triggers_action(),将刚刚加载的属性对应的激发动作,推入action列表。


接著則是在init.rc中會看到一段
on load_all_props_action
    load_all_props
這邊其實才會真正的load file system中的properties
從keywords.h中可以看到
    KEYWORD(load_all_props,        COMMAND, 0, do_load_all_props)
所以去看在do_load_all_props在property_service.c中
    load_properties_from_file(PROP_PATH_SYSTEM_BUILD, NULL);
    load_properties_from_file(PROP_PATH_SYSTEM_DEFAULT, NULL);
    load_properties_from_file(PROP_PATH_VENDOR_BUILD, NULL);
    load_properties_from_file(PROP_PATH_FACTORY, "ro.*");
這邊就會實際的去抓file system中的property files.
有個需注意的部份是在這邊的property_set中會將ro.開頭的property set都擋掉
if(!strncmp(name, "ro.", 3)) return -1;
所以若是在跑到load_all_props之前都還可以set ro.開頭的property, 但是在load_all_props之後ro.xxx就真的變成read only的property了.

參考資料:

Android wifi related

Android 5.1.1

1. Android 網路連線機制並不允許同時有兩個device連外, Ethernet > wifi > mobile network. 會有一個評分機制在連線時決定哪個interface可以連線, 其他的連線則會被斷掉. 但是如果在user space使用command方式連線, 是可以看到一個以上的interface 拿到ip, 但是推測從android端連線出去時, 仍只會從priority高的device連出去.


frameworks/base/services/Java/com/android/server/ConnectivityService.java 將以下選項打開
  private static final boolean DBG = true;
  private static final boolean VDBG = true;
  private static final boolean LOGD_RULES = true;
在log中就可以看到相關評分以及切換網路的動作, 可再往下追code.

參考以下網站將相關的code mark掉的話, 先連上wifi 再接上ethernet, 那wifi並不會強制斷線.但是若先接ethernet再接wifi, 那wifi也還是無法連上, 因為這邊只能將已連上的連線不斷線, 並不能搶走舊的連線.
https://stackoverflow.com/questions/37715525/use-multiple-network-interfaces-in-an-app
https://github.com/CyanogenMod/android_frameworks_base/blob/e49d5ea0858a765c22d8aa96cc660d4708a413fb/services/core/java/com/android/server/ConnectivityService.java#L4264
評分機制ethernet固定是150, wifi則根據RSSI來決定分數, 最高不超過100. 若兩者同分, 則以先連線的interface為主.


通過ConnectivityService之後, 如果是wifi連線, 接著會到WifiStatemachine


wifi state machine就會在各個state中切換, 來完成連線的各個動作, 這部份尚待研究.
接著往下會到JNI部份 frameworks/base/core/jni/android_net_wifi_Wifi.cpp
再往下就到wifi hardware部份 hardware/libhardware_legacy/wifi/wifi.c
在wifi.c時會根據傳入的參數來知道是要sta mode, ap mode or p2p mode. 根據知道是什麼mode之後會去reload相對應的fw.
以下是別人寫的ap mode啟動流程.
Setting->WifiManger->WifiService->WifiController->NetworkManagementService(wifiFirmwareReload)->NativeDaemonConnector(execute)->CommandListener->SoftapController(fwReloadSoftap)->wifi_get_fw_path

接著則會根據是什麼mode來決定要使用什麼tool以及讀取或create相關的conf檔案.
如果是sta mode的話, 就使用wpa_supplicant, ap mode則使用hostapd.


參考資料:
http://blog.csdn.net/kangear/article/details/14446527
http://blog.csdn.net/u010961631/article/details/48629601
http://blog.csdn.net/tankai19880619/article/details/42146287
http://blog.csdn.net/myarrow/article/details/8129607
http://blog.csdn.net/xusiwei1236/article/details/48495485
http://blog.sina.com.cn/s/blog_67e1c5cc0101ttqd.html

2017年7月18日 星期二

Uboot passes arguments to kernel

u-boot 要傳參數到kernel可使用 setenv bootargs
cmd line sample
# setenv bootargs androidboot.selinux=disable
# saveenv

code sample
setenv("bootargs", "androidboot.selinux=disable");

但是在android時, 會在image-android.c中的android_image_get_kernel讀取boot.img中的bootargs
boot.img的bootargs放在 BOARD_KERNEL_CMDLINE
BOARD_KERNEL_CMDLINE := console=ttymxc4,115200 init=/init

需注意的是如果code當中有設bootargs的話, 那在android_image_get_kernel就不會使用BOARD_KERNEL_CMDLINE設定的bootargs
 
int len = 0;
if (*hdr->cmdline) {
 len += strlen(hdr->cmdline);
}

char *bootargs = getenv("bootargs");
if (bootargs)
 len += strlen(bootargs);

char *newbootargs = malloc(len + 2);
if (!newbootargs) {
 puts("Error: malloc in android_image_get_kernel failed!\n");
 return -ENOMEM;
}
*newbootargs = '\0';

if (bootargs) {
 strcpy(newbootargs, bootargs);
} else if (*hdr->cmdline) {
 strcat(newbootargs, hdr->cmdline);
}


接著bootargs會傳到proc/cmdline, 可使用cat來確認傳入的parameter.
若要再交給android做為properties使用, 那可以在bootargs增加androidboot.xxx=xxx
在system/core/init/init.c當中會去處理bootargs.

static void process_kernel_cmdline(void)
{
    /* don't expose the raw commandline to nonpriv processes */

    chmod("/proc/cmdline", 0440);

    /* first pass does the common stuff, and finds if we are in qemu.
     * second pass is only necessary for qemu to export all kernel params
     * as props.
     */

    import_kernel_cmdline(0, import_kernel_nv); //read kernel parameter here

    if (qemu[0])
        import_kernel_cmdline(1, import_kernel_nv);

    /* now propogate the info given on command line to internal variables
     * used by init as well as the current required properties
     */
    export_kernel_boot_props();
}

void import_kernel_cmdline(int in_qemu,
                           void (*import_kernel_nv)(char *name, int in_qemu))
{
    char cmdline[2048];
    char *ptr;
    int fd;

    fd = open("/proc/cmdline", O_RDONLY);

    if (fd >= 0) {
        int n = read(fd, cmdline, sizeof(cmdline) - 1);
        if (n < 0) n = 0;
        /* get rid of trailing newline, it happens */
        if (n > 0 && cmdline[n-1] == '\n') n--;
        cmdline[n] = 0;

        close(fd);

    } else {
        cmdline[0] = 0;
    }

    ptr = cmdline;
    while (ptr && *ptr) {
        char *x = strchr(ptr, ' ');
        if (x != 0) *x++ = 0;
        import_kernel_nv(ptr, in_qemu);

        ptr = x;
    }
}

在import_kernel_nv當中會將androidboot.xxx都換成ro.boot.xxx

static void import_kernel_nv(char *name, int for_emulator)
{
    char *value = strchr(name, '=');
    int name_len = strlen(name);

    if (value == 0) return;
    *value++ = 0;

    if (name_len == 0) return;

    if (for_emulator) {
        /* in the emulator, export any kernel option with the
         * ro.kernel. prefix */
        char buff[PROP_NAME_MAX];
        int len = snprintf( buff, sizeof(buff), "ro.kernel.%s", name );

        if (len < (int)sizeof(buff))
            property_set( buff, value );

        return;
    }

    if (!strcmp(name,"qemu")) {
        strlcpy(qemu, value, sizeof(qemu));
    } else if (!strncmp(name, "androidboot.", 12) && name_len > 12) {
        const char *boot_prop_name = name + 12;
        char prop[PROP_NAME_MAX];
        int cnt;

        cnt = snprintf(prop, sizeof(prop), "ro.boot.%s", boot_prop_name); //change to ro.boot.xxx here

        if (cnt < PROP_NAME_MAX)
            property_set(prop, value);

    }
}

所以如果一開始有設置androidboot.selinux=disable的話, 在經過這邊之後會被換成ro.boot.selinux=disable, boot進android之後使用getprop就可以看到了.

另外一些特定的properties則會經過export_kernel_boot_props再parsing一次.
    struct {
        const char *src_prop;
        const char *dest_prop;
        const char *def_val;
    } prop_map[] = {
        { "ro.boot.serialno", "ro.serialno", "", },
        { "ro.boot.mode", "ro.bootmode", "unknown", },
        { "ro.boot.baseband", "ro.baseband", "unknown", },
        { "ro.boot.bootloader", "ro.bootloader", "unknown", },
    };

2017年6月21日 星期三

Jenkins tips

Jenkins 注意的點, for Android Repo project

1. Use Gerrit Repo plugin, Manifest Branch的部份不需填入branch name. 在後面shell command部份使用repo start切branch即可, manifest branch亂填會導致xml檔錯誤.

2. Gerrit Repo plugin不是非常好用, 有些command的參數無法自己下, 推薦還是使用shell command直接做想下的repo command即可.

3. Gerrit trigger plugin: 先參考plug in wiki上在Gerrit server上做好Jenkins帳號的權限設定.
https://wiki.jenkins-ci.org/display/JENKINS/Gerrit+Trigger#GerritTrigger-SetUp

4. Gerrit trigger plugin: Gerrit server如果設好之後test connection就會顯示success, 如果test ok但是上層的gerrit server status一直有問題的話, 重開Jenkins server. 如果ssh key有改名或換檔案, 也需要重開Jenkins server.

5. Gerrit trigger plugin: 在工作中的設定, path 設**會去monitor 目錄下所有的project, Branches設plain branch_name.

6. Gerrit trigger plugin: plugin可使用下面這行command, 就會merge進此patch,
repo download $GERRIT_PROJECT $GERRIT_CHANGE_NUMBER/$GERRIT_PATCHSET_NUMBER
Note: merge之後並不會自動revert, code會留在目錄中. 需注意$GERRIT_PROJECT, 他會去抓gerrit上的project name, 如果project path有多幾層的話, 可以用sed刪除字串再丟回download path.

7. Shell command中如果使用cp, rm, mkdir需注意權限. copy檔案到/var/lib/jenkins/以外的路徑需先把目錄權限設到777


2017年3月22日 星期三

使用Eclipse開發Linux Kernel 設定

來源: http://maxron.blogspot.tw/2012/05/eclipselinux-kernel.html?view=flipcard

下面文章說3.5.1 + CDT ,不過,基本上只要下載 eclipse forr c/c++ 的版本就有附帶CDT了。功能上就和 source insight 是一樣的,是可以取代source insight 的一種選擇

Here are some steps that I've found to get the CDT to work well with the Linux kernel source. If you exclude some of these steps, it may still work to a large degree, but some things may not work exactly right; for example it may find the wrong include file for a C file.
Anyway, as you do these steps, I think you may understand how they assist the indexer to do a good job for the Linux kernel source.
Disclaimer: these steps were developed for Eclipse 3.5.1 + CDT 6.0.0.
  1. Download and install Eclipse plus the CDT.
  2. Configure and build your kernel to define CONFIG_* and generate autoconf.h. This can be done before or after downloading and installing Eclipse.
  3. Ensure that you have the right kernel source (e.g. make sure you are on the right git branch). If you check out another branch later, that's ok, but you will need to re-index the source, and that takes about 20 minutes.
  4. Start up Eclipse.
  5. Click File->New->C Project
  6. Fill in a project name like my_kernel
  7. Uncheck the Use default location box and type in the root directory of your kernel into the Location box.
  8. In the Project type: pane, click the Makefile project and select Empty Project
  9. On the right side, select Linux GCC
  10. Click Advanced settings... and a Properties dialog will pop up.
  11. Select Resource on the left, and then in the Text file encoding section, select Other and ISO-8859-1 in the box, then click Apply
  12. Select C/C++ Build on the left.
  13. Click on Discovery Options
  14. At the bottom of the screen where it says Compiler invocation arguments, insert "-include include/generated/autoconf.h" at the beginning of that line. Also insert any other compiler options you may need that are not the default, such as "-m64" (Note: for older kernels [pre-2.6.36?], the location of autoconf.h is include/linux/autoconf.h)  <-- cannot find this
  15. You may also need to change the compiler command from gcc to whatever compiler you are using (e.g. you are using a cross compiler).
  16. Open the C/C++ General selection on the left.
  17. Click on Indexer
  18. Checkmark the Enable project specific setttings box.
  19. Uncheck Index source files not included in the build
  20. Clear out the Files to index up-front box.
  21. Click on Paths and Symbols on the left.
  22. Select the Includes tab and then select GNU C
  23. Click Add...
  24. Click Workspace... then select your kernel's include directory
  25. Do another Add, Workspace and add arch/architecture/include, e.g., arch/powerpc/include
  26. Click the # Symbols tab
  27. Click Add...
  28. Set the name to __KERNEL__
  29. Set the value to 1 and click OK
  30. Click the Source Location tab
  31. Click the twisty for your project.
  32. Select the Filter item and click Edit Filter...
  33. Click Add Multiple... and then select all of the arch/* directories in your kernel source that will not be used (i.e. all the ones that are not for the architecture you are using)
  34. Click OK and OK again to dismiss that dialog.
  35. Click OK on the Properties dialog.
  36. Click Finish on the C Project dialog.
  37. Right click on the project and select Index then select Rebuild
  38. It will take about 20 minutes or so to complete.
Notes:
  1. Adding include and arch/architecture/include only gets you a couple of the common include paths. To fully index all of the kernel, you would have to add dozens of paths, unfortunately. Header (.h) files are not present only in include directories. For this reason, I advise against using PTP's remote indexing capability for the linux kernel, because what happens is that it will report thousands of errors in locating header files, and the process of reporting those errors over a possibly long-latency link, will cause the indexing to take many hours.
  2. If you change any of your CONFIG_* settings, in order for Eclipse to recognize those changes, you must do a "build" from within Eclipse. Note, this does not mean to re-build the index; this means to build the kernel, by having Eclipse invoke make (this is normally bound to the Ctrl-B key in Eclipse). Only after a build operation, will Eclipse regenerate the compilation #defines it uses when analyzing the source during indexing and editing.
  3. The background color of "Quick Context View" will be dark if the Ambiance theme in Ubuntu is selected.

2016年8月11日 星期四

Git常用狀況

git的四個folder
remote repository<---->local repository<---->stage<---->working directory

1. 初始download 資料夾from server
$git clone server_name aa  aa是folder name可以自己建

2. 修改完code之後要傳上server
$git add filenameA filenameB      將檔案都丟進stage
$git commit -m "log message"      將檔案commit上local repository
$git push                                        將修改的部分真正傳到server

git add的部分,如果有把握的話可以使用$git add . 會將整個working directory有修改過的檔案都丟進stage,如果沒把握請勿使用,避免傳上不知道狀況的檔案.

3. 更新自己的code到server上最新的code
$git fetch                           更新local repository與remote repository一致
$git merge origin/master   將working directory更新與server上一致,如果有conflict會出現在這邊

如果要看server上改了什麼在git fetch完之後
$git checkout origin/master
$gitk -a

4. 修改conflict的方式
$ vim conflict_file_name
進去之後會看到類似的情況
<<<<<<< c97e4c60de36e44afd801cf0d22aab1399e9269c
123
=======
456
>>>>>>> conflict example
<<<跟>>>中間的部分是git無法merge的部分,===上面是A版的code,===下面是B版的code,自己修改完之後,記得將<<< >>> ===都刪除, press esc-->:-->wq 儲存離開

5. rollback code的方法
如果是本機上的單支code改亂了,要revert到沒改過的狀況
$git checkout file_name
如果是整個資料夾都改壞了,要全部檔案rollback
$git reset --hard HEAD

6. rollback小板的方法
如果只是某幾支檔案要退回xx版,來驗證東西的話
$git checkout xxx_version fileA fileB fileC   可以將特定檔案rollback回xxx version


2016年8月9日 星期二

Git 基本指令

1. git config --list  list all config
2. git config --global xxxxx  ex, git config --global user.name "Jerry"  change user name
3. git init 在任何想要initial成git folder的地方下
4. git clone http://127.0.0.1/ xxxx   clone遠端server的folder下來, xxxx是抓下來的folder名字
5. git status 確認目前有任何的檔案的被更動
6. git add filename 將修改過的檔案加入stage(index)
  a. git add .  將所有修改過的檔案加入
  b. git add -i  使用互動式介面來修改檔案
7. git commit  將在stage中的檔案commit進去
  a. git commit -m "xxxxx" 直接加入commit message
8. git log  查看過去commit的log
  a. git log --stat  detail information
  b. git log xxxx  顯示出特定版本的log
  c. git log filename 特定檔案的log
  d. git log -p filename 特定檔案詳細更改的log
ex:
commit 7e56e3f83c0ac52218b25db1514423d07ae0449d
Author: Jerry Lain <hyde545@gmail.com>
Date:   Wed Aug 3 17:32:06 2016 +0800
$git log 7e56  7e56e3f8  7e56e3f83c0a 都可以
9. git branch   list出現在有哪些branch並告訴你現在在哪個branch
  a. git branch xxx  開出一隻新的branch
  b. git branch -d xxx  移除xxx branch
10. gitk --all  GUI介面list出來所有的commit log
11. git checkout xxx 切換到xxx branch
  a. git checkout fiename 將單支檔案回復到未改過的狀態,如同SVN的revert
  b. git checkout xxxversion filename  切換本機特定檔案跟stage index到某一版本
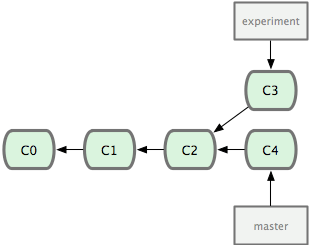
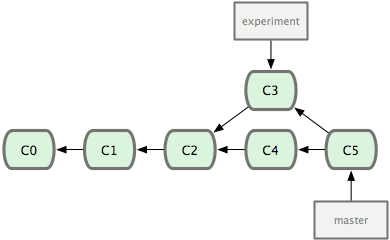
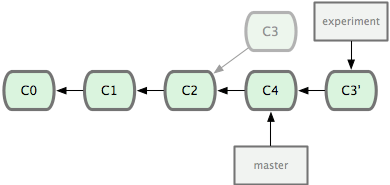
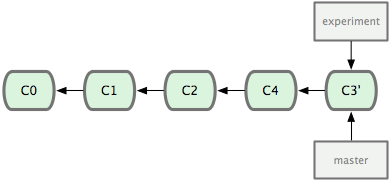
12. git rebase yyy 將目前branch的修改base on yyy branch的功能合併起來,rebase是在yyy branch中更改一份跟原本branch一樣的修改. 在branch出來的位置rebase回master. 否則會變成在branch中更改master,不太符合master是主要分支的概念. rebase完之後需再回到master做一次merge. 這樣的情況下最後得到的結果會與merge一樣,只是在git線圖上可以得到一個更簡潔的圖. rebase之後所有修改的部分都在同一支線中,如果要reset回去的話就不會有分支的問題,直接merge的話,reset回去到分支的版本中會有branch A與branch B兩隻分支檔案不同的問題.
由於rebase是在master上再修改一次,所以branch 的每個checksum會改變.
由於rebase是在master上一版一版修改的加上去,所以conflict的部分也是需要一版一版解決.
merge則是將master與branch合併之後產生一版新的版本,所以conflict一次解決就好.

不要rebase在遠端的資料庫,只能在push之前將local資料庫的history整理好,因為rebase會更改SHA-1的值,rebase遠端的資料庫會將遠端的history打亂,造成其他使用者重複合併修改過的內容以致history大亂. 可以參考https://git-scm.com/book/zh-tw/v1/Git-%E5%88%86%E6%94%AF-%E5%88%86%E6%94%AF%E7%9A%84%E8%A1%8D%E5%90%88 最下方衍合的風險

git rebase onto new-version current-version 將current version"嫁接"到new version上

https://blog.yorkxin.org/2011/07/29/git-rebase

13. git merge xxx  merge是將現在的分支跟xxx分支合併後產生一版新的提交. 在master merge xxx branch才會讓master分支繼續往下走.

遇到conflict時,修改完之後都需要先git add . 將修改的檔案加入stage,接著
rebase: git rebase --continue 讓他繼續做rebase的動作.
merge: git commit 讓他commit一版


14. git reset  回復到某一版本
  a. git reset --hard HEAD 將所有的檔案都回復到HEAD版本
  b. git reset HEAD 本地資料夾中的資料不改,stage的檔案回復,線拉回前一版
  c. git reset --soft HEAD  只有線拉回前一版
  d. git reset HEAD^^ , 也能使用git reset HEAD~2, 回到兩版之前的資料
b and c的情況因為線已經拉回前一版了,所以本地中的檔案不會有任何變動,但是git status會變成需add and commit

退版的方法
1. git checkout xxversion  file_a file_b file_c   只有本機檔案會更動.
2. git revert xxversion  會將xx version更改的檔案rollback並commit進history
3. git rebase -i xxxversion  會列出中間所有version,刪掉那行就會rollback,也會從history中刪除,不留痕跡.


12. git push  將目前的folder push回原本clone的位置
沒有merge到master的資料無法push回去
master branch 是主要的branch,所有修改完的東西都再回到master branch

remote repository, origin/xxx branch
$git checkout origin/master 切回遠端的master

git pull = git fetch + git merge origin/master
git fetch先將local的repository的origin/master更新到server上的位置,再將local master與origin/master merge整個動作就等於 git pull, 所以建議將兩個動作分開, 多使用git fetch

git fetch之後如果要看remote master改了什麼,需要先checkout to origin/master再下gitk才能看

push new branch
git push origin aabranch  aabranch必須是本機上有的branch 而不能直接建新branch到remote

刪除branch
git branch -d aabranch  本機刪除
git push origin :aabranch  remote刪除

git - 後面接一個字的縮寫ex. git config -l 
git -- 後面接全名 ex. git config --list

push-pull, open-drain

Push-pull:
Push-pull輸出,實際上內部是用了兩個電晶體(transistor),此處分別稱為top transistor和bottom transistor。通過開關對應的電晶體,輸出對應的電平。top transistor打開(bottom transistor關閉),輸出為高電平;bottom transistor打開(top transistor關閉),輸出低電平。Push-pull即能夠漏電流(sink current),又可以集電流(source current)。其也許有,也許沒有另外一個狀態:高阻抗(high impedance)狀態。除非Push-pull需要支援額外的高阻抗狀態,否則不需要額外的上拉電阻。


Open-Drain:

Open-drain輸出,則是比push-pull少了個top transistor,只有那個bottom transistor。(就像push-pull中的那樣)當bottom transistor關閉,則輸出為高電平。此處沒法輸出高電平,想要輸出高電平,必須外部再接一個上拉電阻(pull-up resistor)。Open-drain只能夠漏電流(sink current),如果想要集電流(source current),則需要加一個上拉電阻。


常見的GPIO的模式可以配置為open-drain或push-pull,具體實現上,常為通過配置對應的寄存器的某些位元來配置為open-drain或是push-pull。當我們通過CPU去設置那些GPIO的配置寄存器的某位元(bit)的時候,其GPIO硬體IC內部的實現是,會去打開或關閉對應的top transistor。相應地,如果設置為了open-d模式的話,是需要上拉電阻才能實現,也能夠輸出高電平的。因此,如果硬體內部(internal)本身包含了對應的上拉電阻的話,此時會去關閉或打開對應的上拉電阻。如果GPIO硬體IC內部沒有對應的上拉電阻的話,那麼你的硬體電路中,必須自己提供對應的外部(external)的上拉電阻。而push-pull輸出的優勢是速度快,因為線路(line)是以兩種方式驅動的。而帶了上拉電阻的線路,即使以最快的速度去提升電壓,最快也要一個常量的R×C的時間。其中R是電阻,C是寄生電容(parasitic capacitance),包括了pin腳的電容和板子的電容。但是,push-pull相對的缺點是往往需要消耗更多的電流,即功耗相對大。而open-drain所消耗的電流相對較小,由電阻R所限制,而R不能太小,因為當輸出為低電平的時候,需要sink更低的transistor,這意味著更高的功耗。(此段原文:because the lower transistor has to sink that current when the output is low; that means higher power consumption.)而open-drain的好處之一是,允許你cshort(?)多個open-drain的電路,公用一個上拉電阻,此種做法稱為wired-OR連接,此時可以通過拉低任何一個IO的pin腳使得輸出為低電平。為了輸出高電平,則所有的都輸出高電平。此種邏輯,就是“線與”的功能,可以不需要額外的gate電路來實現此部分邏輯。


對於GPIO的模式的設置,在不考慮是否需要額外的上拉電阻的情況下,是設置為open-drain還是push-pull,說到底,還是個權衡的問題:
如果你想要電平轉換速度快的話,那麼就選push-pull,但是缺點是功耗相對會大些。

如果你想要功耗低,且同時具有“線與”的功能,那麼就用open-drain的模式。(同時注意GPIO硬體模組內部是否有上拉電阻,如果沒有,需要硬體電路上添加額外的上拉電阻)

open drain, 外部需有pull up電阻, 內部floating

push pull外部則不須pull up, 由內部control